

It's January, it's cold outside and we're all broke to boot, so what better way to cheer ourselves up than by trying out a new and totally blinging look? Ombre Glitter Lips are easy to create, very effective and will work with any of your favourite darkish lippies.
Step One
- This look is all about the lip, but I refuse to neglect the eyes so lets start with those peepers.
- I'm starting with my foundation - I'm applying Chanel's Perfection Lumiere in Beige Rosé 12. I'm using a Real Techniques Expert Face Brush to apply it to my face. Since it's a little dark for me, I'm also applying it to my neck and ears! If you're wearing tan or a darker foundation than your natural skin tone, don't forget the ears and behind the ears if you're wearing your hair up. That white patch behind the ear can ruin a look!
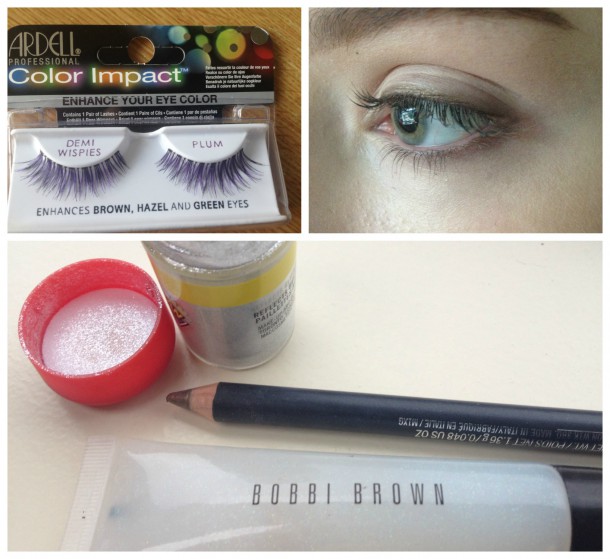
- I'm not applying any eye shadow at all. I'm simply lining the upper and lower lashlines with an antique gold khol pencil (Mac's Powersurge) for some soft definition.
Step Two
- Before applying false lashes, bang on a coat of mascara. Volumising mascara can make false lashes harder to apply, so I'm using a subtler, lengthening mascara to define and darken my lashes without making the falsies awkward to apply. I'm using Mac's Extended Play Gigablack Mascara in Black.
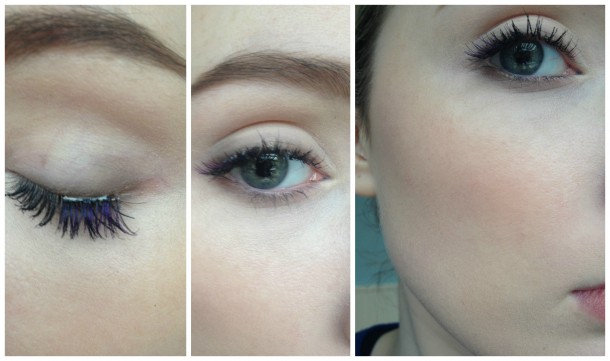
- The ombre lip will contain some purple, so to subtly highlight the eyes further and tie the look together, I'm applying some demi wispie lashes by Ardell, but I've chosen the plum shade.
- I'm cutting the lashes in three, and applying the inner third to the outer edge of my lashes - I want subtle definition; nothing extreme. This will just add a barely-there touch of purple to the eye which will mimic the lip.
- Wait for the glue to dry - if you're using white glue it will take a few minutes to dry clear. Then, go back in with the gold pencil to disguise the lash band.
- Next, I'm applying some blush. As a kind of blush/contouring combo, I'm applying Mac's Tenderling, a brownish pink shade, to the apple of the cheek and all the way back into the hairline.
Step Three
Advertised
- Now for the fun bit! I'll be using three shades of lipstick. They're all from Rimmel's Moisture Renew range. I've chosen three from the same range because they all have the same consistency and finish, but don't worry too much about this as we'll be applying gloss at the end. Use whatever you've got. The three shades I've chosen are Sloane's Plum (330), Diva Red (500) and Mayfair Red Lady (510).
- You'll need to give your lips a thorough exfoliating with a cotton bud and some lip balm - you'll need a smooth surface for this look!
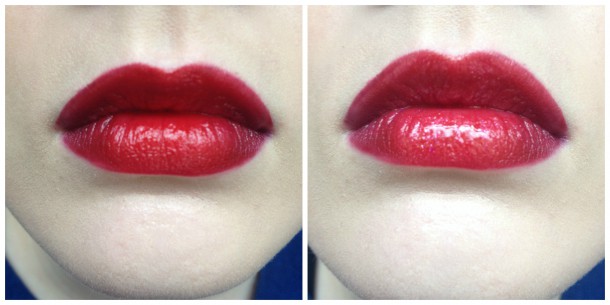
- Begin with a dark plum lip liner and line your lips as in the photo. Colour in the outer corner of your upper and lower lips.
- Next, take a clean lip brush and your middle red shade (in my case, Diva Red). Paint the red over the purple liner and cover both lips apart from the very centre of the top and bottom lip. Take care while you're doing this to use your lip brush to create a nice clean edge. You can overdraw the lips if you want to, but remember that this sort of ombré technique makes lips look much more voluminous anyway, so don't overdraw too much!
- Next, grab your brightest shade of red, and, straight from the bullet, apply it to the centre of your top and bottom lip.
- Next, take your darkest plum shade and with the lip brush, reapply it to the corners of your lips.
Step Four
- Now, grab your plum liner again and retrace very lightly all the way around the lips, keeping it heavier at the corners and lighter in the centre of the lips.
- You could stop here if you like - or apply some glitter. All you need to make your own glitter gloss is some clear gloss and a very fine loose glitter. I'm using Bobbi Brown's Glitter Lip Gloss, which already contains some glitter, but it's not glittery enough for me! So I'm squeezing some of it onto the back of my hand and shaking in some Mac Reflects Glitter in Pearl. Its fine enough not to irritate your lips or feel gritty on them.
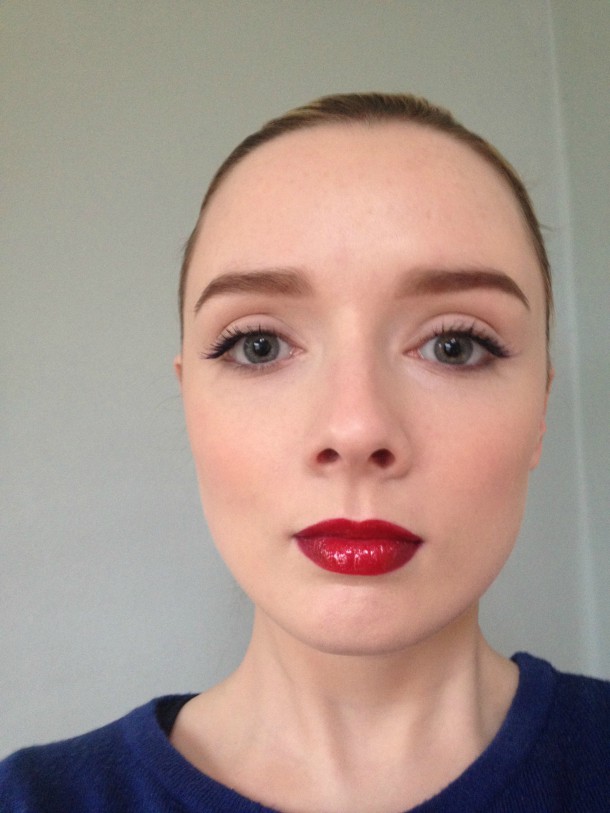
- Mix the two together with your ring finger and then apply a generous amount to the centre of your upper and lower lips.
- If you're fussy like me, go around the outside of the lips with some concealer on a lip brush for an extra-clean finish.
- Done. I know - Big!
Now out you go and have some fun! There are some restrictions with this lip look. It does not withstand kissing well (you'll look like you've been in a fight) or taco fries. You also can't wipe your mouth with the back of your hand like a cowboy without very, very ugly results. Other than that, you're good to go!
Would you try a look like this? Or is it just too much bother?
Advertised

