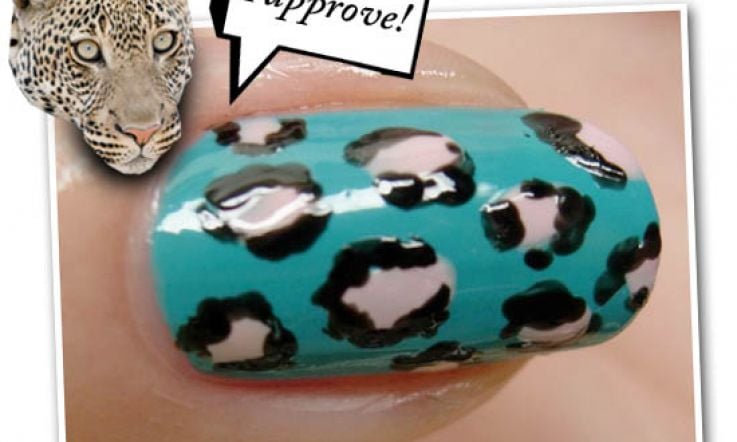
Beaut.ie How To: DIY Leopard Print Nails

Flipping through the September issues of the magazines this year, a feeling of déjà vu has been creeping over me.
Hot as the hob of hell for Autumn/Winter 2010 fashion: kitten heels. Pointy toed shoes. Capes. Flared - or at the very least, bootcut - trousers. Camel as a colour, rather than a long-lashed humped animal with a cameo in SATC2. There's lots of enthusiastic talk of a return to ladylike, grown-up dressing with an emphasis on elegance and minimalism, but most of what I'm seeing in the mags makes AW10 feel more like a straight up return to the mid '90s than anything inspired by Mad Men.
Anyway, one of the other key trends of the season is Bet Lynch's favourite print, and since even YSL has tipped the nod to a bit of nail art with Manucure Couture, it looks like AW10's the time to work a bit of animal magic on your fingertips.
No special brushes or pens or other nail art accoutrements? No problem. Here's what you need to follow my guide to achieving leopard print spots you won't want to change:
- three bottles of nail varnish (a base colour, at least one contrasting colour for the centre of the leopard spots, and a black polish to define their edges);
- a bit of time; and
- a reasonably steady hand.
Simples!
Advertisement
- Begin prepping your nails by removing any old nail varnish and filing them into your desired shape. Push back cuticles if required, and swipe a cotton paid bearing some nail varnish remover across the nail plate to degrease it before applying a thin layer of base coat.
- Lay down your main colour (I used Rimmel Sky High for this job). Two coats may be required, but if you're using a reasonably opaque varnish you may actually find you can get away with a single coat, since the leopard print you apply later will be covering up some of this base colour.
- Now get ready to apply the colour(s) that will act as the centre of the leopard spots - if you have a colour that will be opaque in one coat, that would be ideal (I used Barry M Baby Pink, which wasn't, and two coats were required for my spots).Be sure to remove excess polish from the brush as you remove it from the bottle. As you take out the brush, roll the stem around the inner neck of the bottle, and then carefully swipe both sides of the brush itself on the inside edge of the bottle's neck to only leave a small bead of colour on the end of the brush.
- Daub on your spots! Don't worry too much about trying to get them all the same shape or size or even very rounded. Squared-off ovals or round-ended rectangles will still look like leopard print by the time we're through. Just try to keep them as thin and as un-blobby as possible to minimise drying time.
Advertisement
- It's time to define the edges with your black nail varnish. Remove all nail varnish from the brush as Step 3 above, but this time don't even leave the bead of colour at the tip of the brush. Instead, lay down that bead and a few more drops too either on the rim of the neck of the bottle or on something like a piece of scrap paper (but nothing that's going to immediately absorb them).
You want to try and keep the tip of the brush as flat as possible - this will give you both a neat long edge and neat corners at the bottom of the brush which you can use for precision application of the black polish.
- Dip the very bottom of the brush into your black nail varnish reservoir to pick up a small amount of colour. For larger spots, laying down the long edge of the brush will pretty much instantly take care of one side of the spot; use the corner of the brush to edge smaller spots or for greater control.
Don't create a black border the whole way around the spot - leaving open ends and using three or four strokes to create the borders looks more leopard print and less polka dot gone awry. And again, there's no need to worry if your borders look a bit irregular. It actually adds to the effect, hurrah!
Pop on a topcoat and - now, this is crucial - sit back and admire your handiwork while it dries. You should be left with a little something like the above.
Even if you wouldn't wear a whole ten digits adorned with leopard print, you could always just rock it as an accent nail.
And, of course, there's an infinite number of colour combos to choose from if my tack-tastic teal and pink aren't really your thang...
If you've got a metallic polish that fell short of your Minx-alike hopes, use it as your base colour to channel their gold or silver leopard print numbers.
Alternatively, if that's all a bit out there for you, how about just letting out your wild side to play by blinging up the classic?
Bet Lynch, eat your heart out!