Back to Basics #2: How to Contour Using Cream and Powder Products + Highlighting

We've got two ways of doing contouring and highlighting in this second Back to Basics tutorial, and again, we're crossing price points with products. Use what you're comfortable with - you don't need to rush out and buy these products by any means. They're what makeup artist Leonard Daly likes, uses and recommends, but everyone has their personal favourites.
Our first way is using Tom Ford's dual Shade and Illuminate palette, the second is with a cheaper bronzer from Rimmel and separate highlighter. Contouring is a big beauty buzz at the moment and lots of girls are painting brown stripes onto their faces willy-nilly, purely to follow trends. But why is it a thing? Here's what's important to know: "The basis of contouring and highlighting", says Leonard, "is that you contour anything you want smaller and you highlight anything you want to emphasise." This is why you contour around the nose, cheeks and chin - to reduce; and you highlight around the lips and eyes - to make them stand out.
Right! Lets get started. A contour using cream products is first.
Step 1: the first thing you need to do is look for bones of face. Find the hollow of your bones and skin at top of the cheekbone. Don't be afraid to press your skin firmly to find your bones, you won't hurt yourself. Identifying where your cheekbones are is key as that's where you'll be putting the product. Chin and temples are easier to easily identify, obviously!
Advertisement
Step 2: Once you've felt for cheekbones, apply the colour keeping the brush flat on the face, but making sure that you're placing the product underneath the cheekbones, along the hollow beneath the bone. Brush-wise, Leonard used the Tom Ford Shade and Illuminate brush, but you could use fingers or a flat foundation one would be fine too. He also recommends the Becca stipple brush.
Step 3: Contouring isn't just for cheeks: if someone has a weak jawline you can contour underneath the jaw in the fleshy part - a trick used to great effect by Boy George, fact fanz. You can also contour just above the temple to slim in the forehead, and down the sides of the nose. Leonard's demonstrated on Eva, above, where you'd place the colour in some of those cases.
Step 4: Blending is key. Get a clean brush - don't use the one with which you applied the cream product as the secret with contour is to really melt the colour into the skin, leaving no harsh lines. The illusion of shade and shape is the desired effect, not stripes of bronzer! So don't be afraid to really blend, blend, blend all the colour out until there's very little left on the skin - for someone as pale as Eva, a little bronzer goes a long way; if you're more sallow, tanned or have a darker skintone, your skin will be able to take more colour and a stronger contour.
Advertisement
Step 5: When it comes to luminising, one of the key areas is around the eyes. Leonard's demonstrating above where to place highlighter.
Leonard's Tip: "Highlight in “C” shape – from above the brow to top of the cheekbone"
Super-subtle, but you can just see the gleam of the Tom Ford luminiser by Eva's eye.
Next up, using powder products; Leonard choose a medium matte Rimmel Sunshimmer bronzer and The Balm's Mary-Lou Manizer for a highlight. He picked an angled brush from Sephora as his applicator of choice.
Advertisement
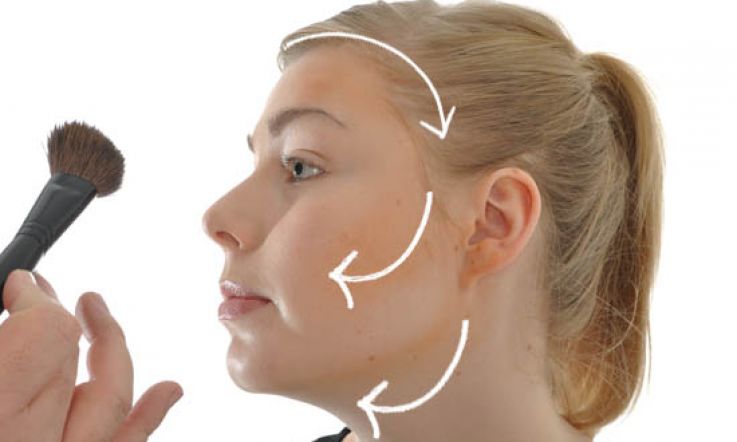
Step 1: When using powders, contouring with bronzer using an angled brush working in a “3” shape, he recommends. All that means is you apply product to the temples, cheeks and jawline in the shape of the number three, as above. It looks messy at the moment - but don't worry!
Step 2: again, blending is key to make sure product is distributed evenly.
Step 3: for highlighting, Leonard used a powder this time, the Balm's Mary Lou Manizer and the same brush. Where to apply? He recommends the brow bone, and that you blend on cheekbones and temples, the cupids bow and below the lips. Add a tiny bit on the bridge of the nose too.
Credits:
Makeup artist: Leonard Daly, www.leonarddaly.com
Model: Eva Lawes
Photographs: Kirstie McDermott