
There seems to be a bit of a divide about when debs season kicks off. As a Dublin girl, September heralds the beginning of debs season for me but Andrea and Miriam (from Kerry and Galway respectively) both had their debs in July/August. So whenever you are getting your grad gown on, here's a tutorial for you using one of the most popular eye palettes around.
Debs are now such a huge affair, much bigger than years ago when I had mine. And working as a make up artist, eevery year I have clients that tell me of almost wedding-like additions to the celebrations. For my debs, I got my makeup done in the local beauticians because my mum's friend kindly bought me a voucher. But it was so bad, I had to wash my face when I got home. And the worst part of this story is that as soon as I had washed it off, I heard the doorbell ring and it was my date and a bus full of people waiting to go down to Naas. So I had to try to bring what I needed and apply it to my face on a bus full of drunken teenagers. Needless to say, it wasn't the best I ever looked.
Now back to you, let's hope it's a better night than mine was.
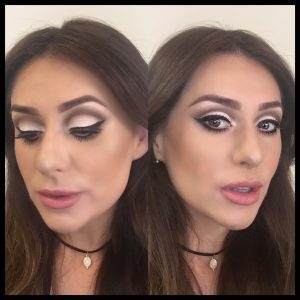
For this tutorial, I am using the wonderful Pippa Palette however you can use other colours in the same technique.
And remember to be creative, that's what makeup is all about after all.
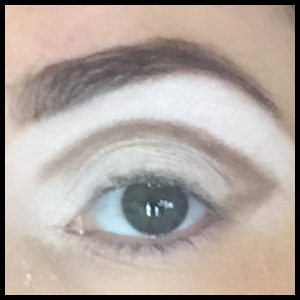
Step 1:

Using "Lily" and a flat brush, press in onto the eyelid all the way up to the brow. Yes, it looks a bit scary at this point but it's ok that it looks white, we are just using it as a base to blend. When you think you have applied enough, you probably haven't, so keep pressing it on. The base is the most important part. Without it, the rest of your eye shadow won't look or sit well.
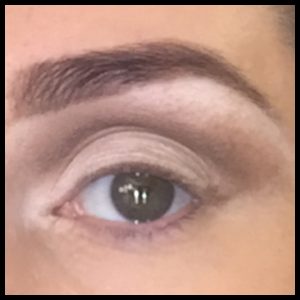
Step 2:
With a slanted or tapered brush, using "DoDo" extend the lower lash line up to meet the crease, and draw in the crease. And yes, I am upping the scary-looking ante at this juncture. But it's all 'bout the base, 'bout the base so stay with me.
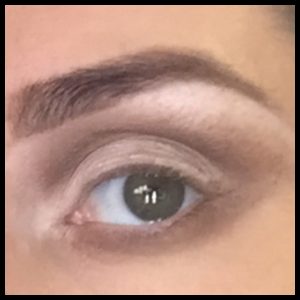
Step 3:
Using the same brush start to blend the line up towards the brow.
Step 4:
Advertised
Bring the product under the lower lash line, and then switch to a fluffy blending brush. Using "Tobi" as your transition colour, start in the crease and blend out up towards the brow and under the lower lash line.
Step 5:
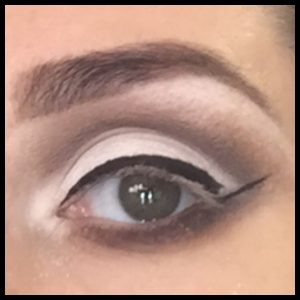
Next take your favorite liquid liner of choice, I used Wet 'n'Wild and follow the lash line, keeping it smaller on the inner corner (tear duct) then slightly thicker on the outer corner. Next, extend the lower lash line into a flick. These two lines do not have to join yet.
Step 6:
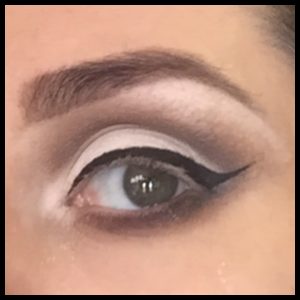
Wing the second line (flick) back in towards your base liner and join them.
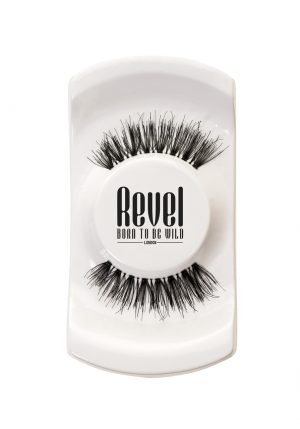
Step 7:
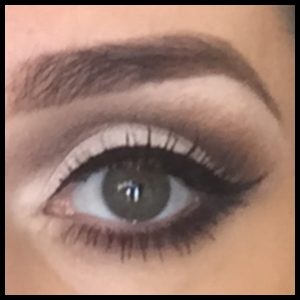
For the purpose of this tutorial I applied false lashes, I used Revel style #SL024 False Lashes and applied loads of mascara after.
If you missed my pro tips on how to apply false lashes check it out here.
Now your debs makeup is sorted, all you have to think about is your dress, hair, jewellery, date, shoes, limo, pre-drinks, photographer, and so on.....
Advertised
When is your debs? And if it's in the distant debs-y past, what make up look did you wear on the night? And if you have any debs make up looks that you'd like to see or questions that you'd like an answer to, please leave a comment below.

