

Being a makeup artist doesn't stop you from getting stuck in a makeup rut. Like everyone else, you find a look or technique that works for you, and you tend to stick with it.
Though I love doing heavier, rock inspired looks on other people (this tutorial is a rock chick's dream), I can forget to mix it up myself, so here's a look for anyone who wants to change things up, or just loves a grungy makeup that's not too much to wear during the day.
Do bear in mind that this look won't be for everyone.
Grunge makeup is designed to look 'worn in' and slightly deconstructed. So if you're a polished, finished makeup person (like I am most of the time) this one might not be your cup of tea. Still, it's quick, uses just three products, and involves a technique you might not have tried before, so read on!

Step One
- Normally, I apply foundation first and take it over my eyelids to provide a bit of a base for the eyeshadow to glide over and cling to. Because a grungy look is supposed to look almost as though you've slept in it, I'm skipping foundation for now and immediately applying powder to my dry lid.
- Any Beaut.ie regular will know that a cream base prolongs the life of your eyeshadow, prevents streaking and generally promotes even application of powders. For once, I don't want that - I want a messy, uneven application, and I want it to crease as the day goes by!
- You can choose any finishes you want, but I'm opting for matte, and since I want this to be a slightly more wearable day look, I'm using two shades of brown. To take this to evening, use grey and black, or if you're feeling really adventurous, go with black and a bright indigo or peacock green!
- I've chosen Quarry from Mac - it's a mid-tone stony brown, and I'm pairing it with concrete, another matte option from Mac, which is a deep chocolatey colour.
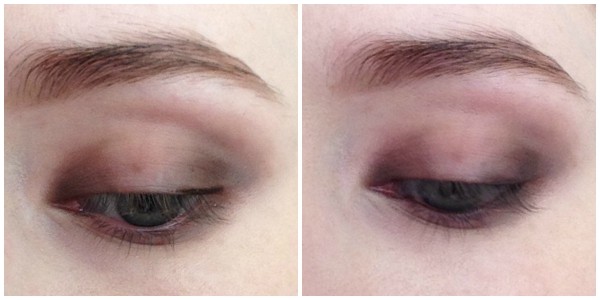
- With a fluffy brush, dust Quarry all over the eyelid. Don't worry too much about being careful here - a bit of untidiness is desirable. With a clean brush, blend the edges. You'll notice that you need to blend for longer to get powder to buff away on a bare lid.
- Next take a pencil brush - or any small, pointed and softly fluffy brush. Use this to apply your darker shadow. Start at the inner corner working in toward the centre of the lid. You're essentially just filling in the little triangle of your eyelid at the inner corner.
- As in the above left photo, take this only about a third of the way in toward the centre of the lid. Then, with the same clean brush you used before, give the whole lot a little buff to clean away harsh edges and give it a slightly worn look.
- Do exactly the same thing at the outer corner, sticking to the lid, going a third of the way in toward the centre of the eyelid, and blending away.
- Because you haven't applied any base to the lid, you'll have to work harder to build up the shadow, so go over your work a couple of times to build up the intensity,
Advertised
Step Two
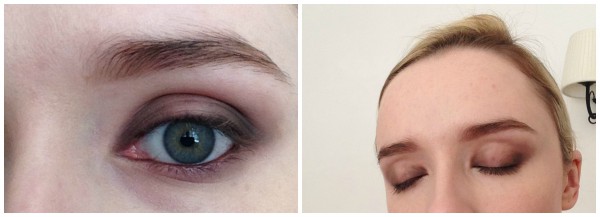
- Using the same pencil brush, take your darker shadow under the eye - don't be afraid to go quite far under the eye with it. If you feel like it's too far, a bit of concealer on a fluffy brush will clean everything right up.
- Again, because I'm going for wearable with this, I'm using a brown liner (Mac Coffee), but you can absolutely go far black if you want to.
- Rather than lining all the way along the lashline as I usually would, I'm just taking the liner along the upper lashline where my dark shadow is at the outer corner. This will add some depth without ruining my carefully constructed untidy look!
- Next, take your liner along the upper and lower waterlines, If you're a bit squeamish about this step, you can skip it, but you'll look less grungy!
Step Three
- The next rational step is to apply mascara, right? So I'm not. I'm leaving my lashes bare because it gives the makeup a strange deconstructed look, and it also prevents the lashes from breaking the effect of the eyeshadow. If you feel more comfortable with mascara, do apply some, though keep in mind that the eye will look immediately more polished.
- I finished the look by applying a foundation with decent coverage - a messy eye paired with blemished skin will give the impression of a messy face, so blemish cover and an even complexion becomes even more essential.
- You can soften the overall look by applying some blush, but if you want to go full-on grunge, I's recommend applying just some contour and a bit of highlighter across the cheekbones. Nars Dual Intensity Blush in Craving would be perfect.
There it is! The easiest grungy eye you'll ever do.
If this look isn't for you, the technique of applying a dark shade in the inner and outer corner can still be used to create a fantastic smoky eye - give it a go and see what you get.
Advertised
If you like grunge makeup, but prefer something a little more constructed and polished, try this Brigitte Bardot inspired look.
Would you give this a go? Or is the grungy look a no-go for you?

