
Lily Allen's recent 'Hard Out Here' music video caused quite a stir. As a feminist, there are aspects of the video that I think aren't completely successful in achieving what they set out to. Regardless, Lily's self-effacing feminist approach is refreshing in a sea of misogynistic music videos and lyrics.
All that aside, as a makeup artist, the video filled me with joy. Lily's bejewelled eyes are glorious, and both easy and inexpensive to achieve. So if you feel like standing out at a Christmas party or special occasion, this eye look is definitely for you.

Since this is a makeup/craft project hybrid, you'll need a couple of unusual items to complete the look, so make sure that you have
- Tweezers
- Good Quality Eyelash Glue
- Some nail art crystals
- A blunt skewer or nail art dotting tool
- Time to make mistakes and keep at it!
I got my crystals in the Art and Hobby shop for €2.50. You need to make sure that the crystals are very small. Choose whatever colour takes your fancy. I couldn't find the champagne shade that Lily sports in the video, so I got some gold ones instead. While at the Art and Hobby shop, I picked myself up a new eyeliner brush. A very fine tipped painter's brush is perfect for lining eyes, and mine cost me just €5.50. You'll need a brush with a very fine tip for this sort of precision lining.
Step One
- Start by putting a big blob of lash glue onto a plate or piece of card - it needs a bit of time to get tacky so that the crystals will stick immediately.
- I've done my base with Mac Studio Fix Foundation to recreate Lily's matte skin. I've also filled in my brows with Omega shadow from Mac for a full but not overly strong brow.
- I've applied some Bobbi Brown Long Wear Cream Shadow in Goldstone to my lids. You can use any soft gold cream shadow - it will last longer than powder and help the crystals to adhere to the lid later.
- I've then contoured my crease very softly with some matte brown eyeshadow. I'm using Wedge from Mac, and have swept that very softly along the crease of my eye with a fluffy blending brush.
- The liner for this look is very tricky, but you don't have to recreate the liner as I'm doing it - you can create this look with any shape of liner you like. See my previous tutorial on liner shapes to brush up you liner skills!
- I've recreated the intricate liner that Lily wears in the video, but obviously I've had to adjust it for my eye shape, which is totally different from hers. The effect is lovely though - if you manage to get it right, then the liner is a different shape on the closed eye than it is on the open eye.
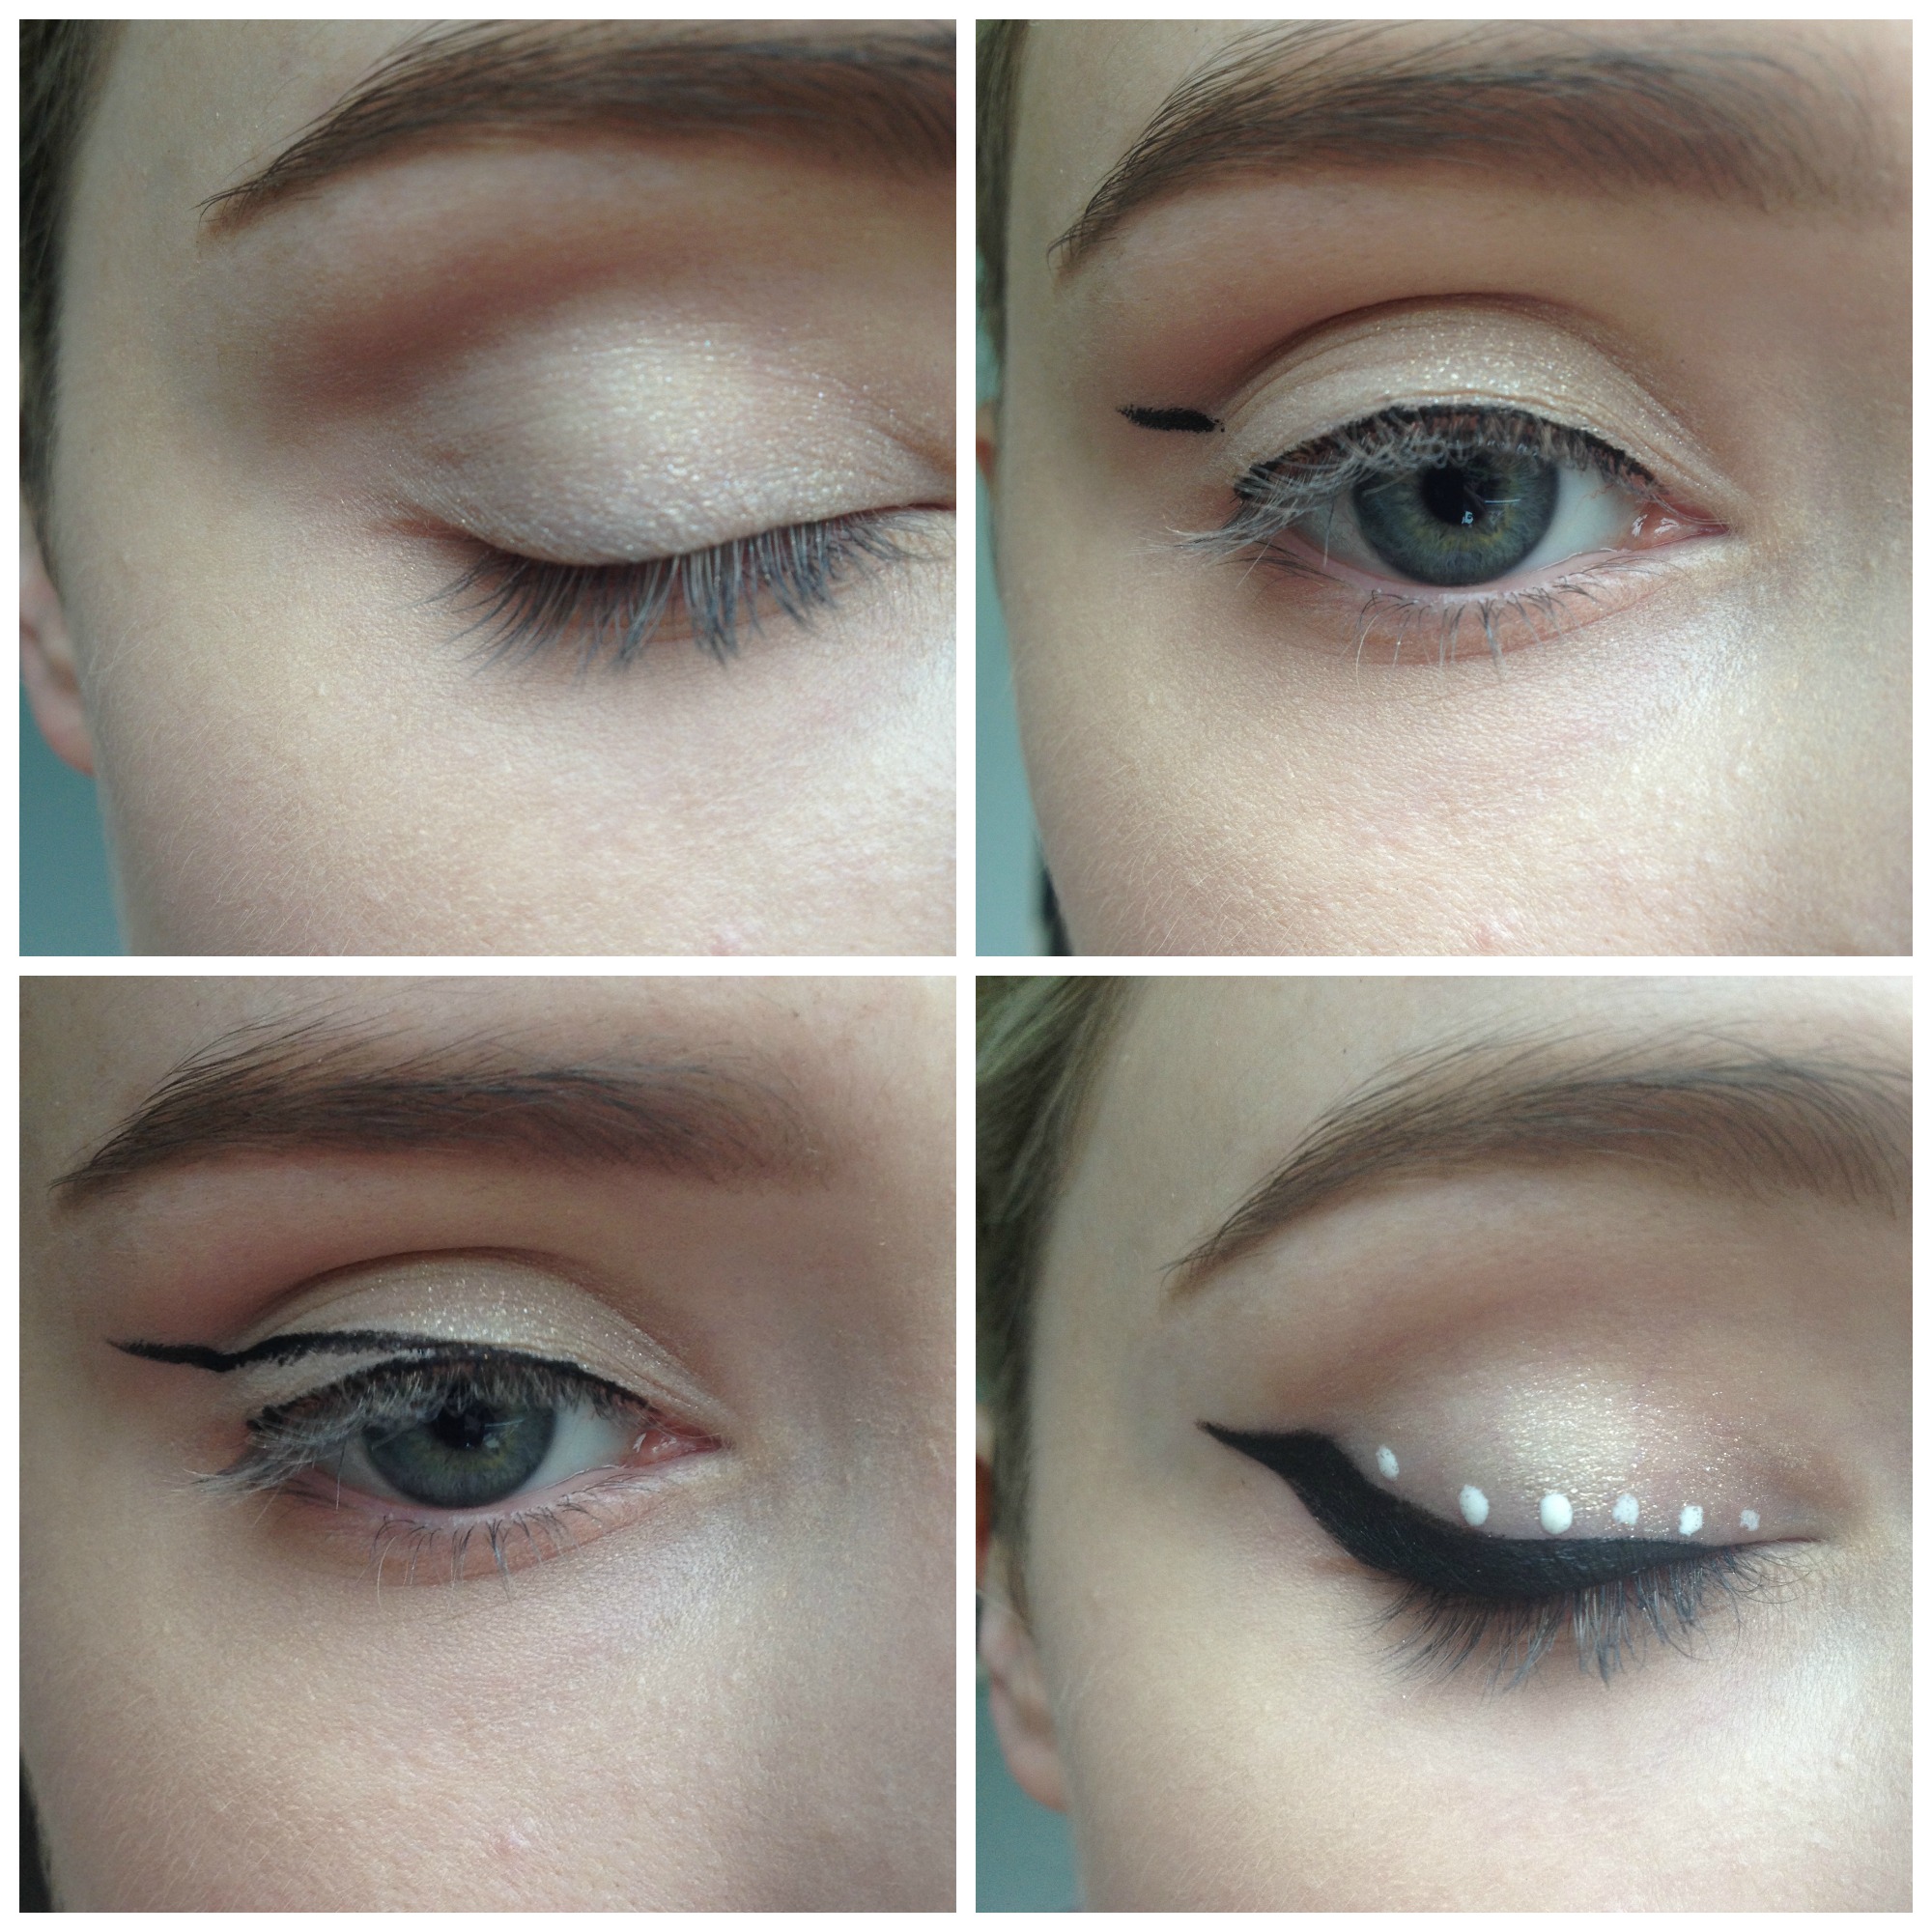
- To achieve this line, you'll need to grab a black gel liner (I'm using my beloved Maybelline of course) and your fine liner brush. Line very carefully and thinly along the lash line, and stop at the natural stopping point of the eye. This is just your guide line.
- Now, looking straight ahead into the mirror (that bit is important!) find the point where the crease of your eyelid stops. You can see where I've marked mine in the picture.
- You need to draw a little horizontal line here- this is the guide line for the extreme flick that Lily wears in the video.
- When you're happy with what you've got so far (and keep your cotton buds to hand for any corrections) you need to look down into a mirror, and join the point where the little line meets your lid down in a curve to your lashline. It sounds awfully complicated, but the pictures will guide you!
- Next, go to the outer edge of the little line you've made next to the crease, and form a little V. Then curve the line back down to meet the lashes. Again, it sounds complex, but it's really just a case of copying the outline, and then filling it in.
- When you're happy with the liner on both eyes, take a BLUNT skewer or even better, a nail art dotting tool. Dip it into the lash glue and dot the glue along the lid above your eyeliner. Be so careful not to jab yourself in the eye!
- As you can see in the picture, I've placed six dots along the lid.

Advertised
Step Two
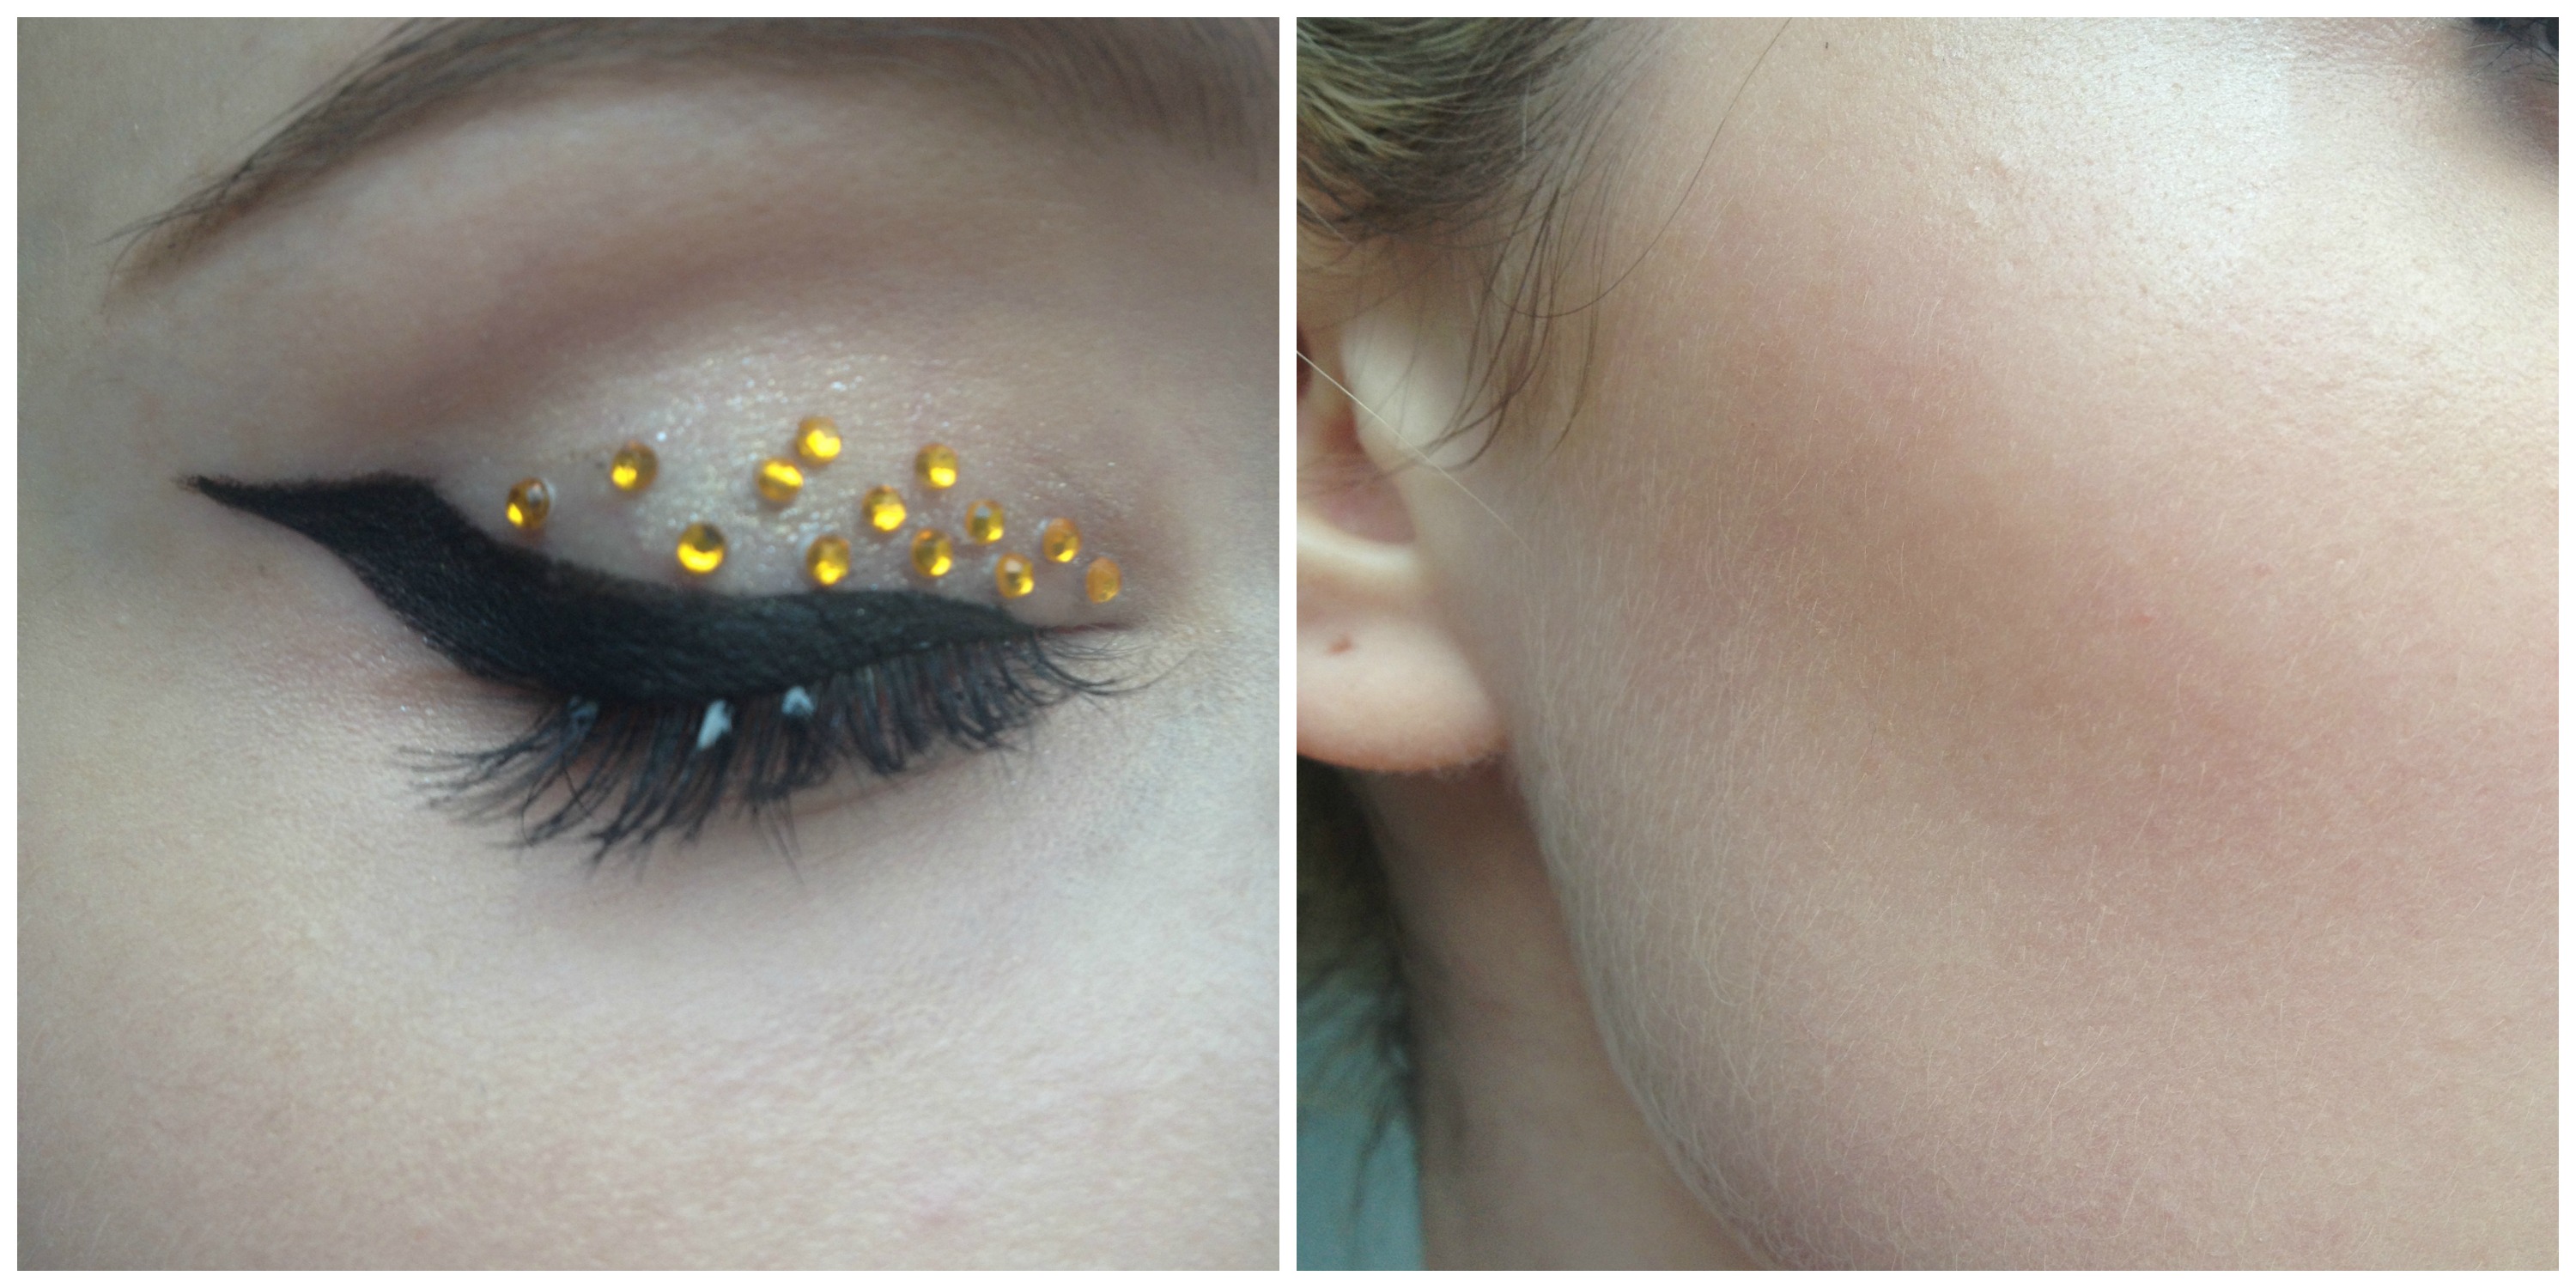
- Grab a crystal with your tweezers, and pop it onto the glue dot. Continue until you've placed a crystal on every dot of glue.
- Then, dot on a second line of glue above the one you've just completed.
- Repeat the process until you've covered your lid as much as you'd like!
- Be careful to keep the crystals to the lid area - the eye will become untidy looking if the crystals continue above the crease.
- And don't worry, they won't budge. I wore this look for nine hours to make sure; it's a bit much for Tesco, but I had to be certain!
Step Three
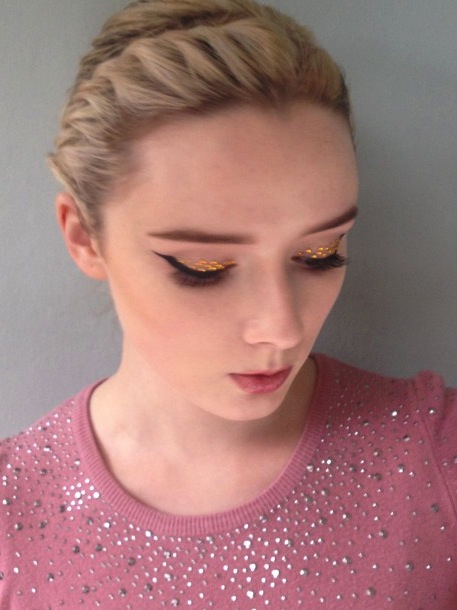
- Apply a really black volumising mascara liberally. I'm using YSL's Faux Cils mascara in black.
- Grab a set of false lashes, dip them in your lash glue, and apply them to the lashline. I'm using Ardell individual lashes in medium half way along the eye to beef up my lashes without making my lids feel heavy.
- Then take your contour product. Lily's contour in the video is quite sharp and unblended. To achieve that sharpness, I'm using a cream contour product.
- I'm using Mac's Pro Sculpting Cream in Poor Sculpture. Apply a thin layer of this to the part of your palm that is connected to your thumb (see my previous tutorial for further instructions on this method.)
- Press this area of your hand into the hollow beneath your cheek bone. This part of your hand fits perfectly into the hollow and will create a subtle, but defined, line of contour.
- Then apply a cream highlighter to the tops of your cheek bones, the bridge of your nose and your cupid's bow. I used Mac's Cream Colour Base in Luna, and I've applied it with my fingers.
- I'm skipping blush to stay true to the look, but you can apply some if you want a softer effect.
Step Four
- Lily wore this eye with several lip looks in the video, but rather than pairing it with a red lip like the one she's sporting at the beginning of the video, I've chosen the glossy dark pink lip that she wears later.
- To achieve this, I've lined my lips with L'oréal's Infallible lip liner in Always Toasted. I then applied some of Mac's Dazzleglass in Date Night to give a glossy finish.

Advertised
Done! It is a tricky one, but you can adjust it in a million ways to suit your time and skill level. Even a single line of black crystals as liner along the upper lashline would make for some very festive Christmas makeup. It's glamorous and it's different.
Can you see yourself turning up at the office party with blingtastic peepers? Or does it all seem a bit much?

